지난 글에서 밋밋한 디자인의 2D 주사위를 만들어보았다.
하지만 내가 원하는 것은 예쁜 가지각색 디자인의 3D 주사위!!
우선 프로세싱에 대한 개념을 익히기 위해 튜토리얼 영상 시청 해주었다.
https://processing.org/tutorials
Tutorials
Links to videos that cover the Processing basics.
processing.org
GPT와 함께 구현 완료!
아래는 코드이다.
PImage bgTexture;

void setup() {
  size(400, 300, P3D);
  bgTexture = loadImage("skin_ice.png"); // 배경 이미지 로드
  if (bgTexture == null) {
    println("Image not loaded");
  }
  textureMode(NORMAL);
}

void draw() {
  background(100);
  //lights();
  translate(width / 2, height / 2, -200);
  rotateX(radians(frameCount));
  rotateY(radians(frameCount));
  rotateZ(radians(frameCount / 2));
  drawDice();
}

void drawDice() {
  color c = color(255,255,255);
  int face_size = 50;
  // +Z face
  beginShape(QUADS);
  texture(bgTexture);
  face(-face_size, -face_size, face_size, face_size, -face_size, face_size, face_size, face_size, face_size, -face_size, face_size, face_size);
  endShape();
  pushMatrix();
  translate(0, 0, face_size + 1); // 약간 앞으로 이동
  drawDots(1, c);
  popMatrix();

  // -Z face
  beginShape(QUADS);
  texture(bgTexture);
  face(face_size, -face_size, -face_size, -face_size, -face_size, -face_size, -face_size, face_size, -face_size, face_size, face_size, -face_size);
  endShape();
  pushMatrix();
  translate(0, 0, -(face_size + 1)); // 약간 뒤로 이동
  drawDots(6, c);
  popMatrix();

  // +X face
  beginShape(QUADS);
  texture(bgTexture);
  face(face_size, -face_size, face_size, face_size, -face_size, -face_size, face_size, face_size, -face_size, face_size, face_size, face_size);
  endShape();
  pushMatrix();
  translate(face_size + 1, 0, 0); // 약간 오른쪽으로 이동
  rotateY(HALF_PI);
  drawDots(2, c);
  popMatrix();

  // -X face
  beginShape(QUADS);
  texture(bgTexture);
  face(-face_size, -face_size, -face_size, -face_size, -face_size, face_size, -face_size, face_size, face_size, -face_size, face_size, -face_size);
  endShape();
  pushMatrix();
  translate(-(face_size + 1), 0, 0); // 약간 왼쪽으로 이동
  rotateY(-HALF_PI);
  drawDots(5, c);
  popMatrix();

  // +Y face
  beginShape(QUADS);
  texture(bgTexture);
  face(-face_size, face_size, face_size, face_size, face_size, face_size, face_size, face_size, -face_size, -face_size, face_size, -face_size);
  endShape();
  pushMatrix();
  translate(0, face_size + 1, 0); // 약간 위로 이동
  rotateX(-HALF_PI);
  drawDots(3, c);
  popMatrix();

  // -Y face
  beginShape(QUADS);
  texture(bgTexture);
  face(-face_size, -face_size, -face_size, face_size, -face_size, -face_size, face_size, -face_size, face_size, -face_size, -face_size, face_size);
  endShape();
  pushMatrix();
  translate(0, -(face_size + 1), 0); // 약간 아래로 이동
  rotateX(HALF_PI);
  drawDots(4, c);
  popMatrix();
}


void face(float x0, float y0, float z0, float x1, float y1, float z1, float x2, float y2, float z2, float x3, float y3, float z3) {
  vertex(x0, y0, z0, 0, 0);
  vertex(x1, y1, z1, 1, 0);
  vertex(x2, y2, z2, 1, 1);
  vertex(x3, y3, z3, 0, 1);
}

void drawDots(int value, color c) {
  fill(c);
  noStroke();
  float d = 15; // 점의 크기
  switch (value) {
    case 1:
      ellipse(0, 0, d, d);
      break;
    case 2:
      ellipse(-20, -20, d, d);
      ellipse(20, 20, d, d);
      break;
    case 3:
      ellipse(-20, -20, d, d);
      ellipse(0, 0, d, d);
      ellipse(20, 20, d, d);
      break;
    case 4:
      ellipse(-20, -20, d, d);
      ellipse(20, -20, d, d);
      ellipse(-20, 20, d, d);
      ellipse(20, 20, d, d);
      break;
    case 5:
      ellipse(-20, -20, d, d);
      ellipse(20, -20, d, d);
      ellipse(0, 0, d, d);
      ellipse(-20, 20, d, d);
      ellipse(20, 20, d, d);
      break;
    case 6:
      ellipse(-20, -20, d, d);
      ellipse(20, -20, d, d);
      ellipse(-20, 0, d, d);
      ellipse(20, 0, d, d);
      ellipse(-20, 20, d, d);
      ellipse(20, 20, d, d);
      break;
  }
}
이리 저리 해매면서 배웠던 것들은 아래와 같다.
* 이미지는 .pde 파일 경로에 data 폴더를 생성해서 넣어주어야 한다.

* light 옵션에 따라 일부 이미지가 어두워지는 경우가 있었다.

* beginShape(QUADS);
이 함수는 3D 객체를 만들기 위한 함수이다.
beginShape() ~ endShape() 사이에 있는 그리기 함수들을 묶어 하나의 객체로 만듬.
파라미터에 QUADS가 들어가는 경우에는 꼭짓점 4개로 3D 사각형 객체를 만들 수 있다.
위 코드에서는 face 함수를 통해 4 꼭짓점 변수들을 한번에 전달하는 방식을 사용했다.

* 각 면에 눈금을 그리는 작업은 조금 복잡하다.

현재 각 면들은 3D 좌표 상의 꼭짓점 좌표들로 구성이 되어있는 QUADS 객체.
이 면들을 xy좌표계로 변환시켜 Dots그리기 쉽게 해야한다.
pushMatrix: 현재의 변환 행렬을 스택에 저장합니다. 이 시점에서의 변환 상태(위치, 회전, 스케일링 등)를 저장.
translate: 주사위 면보다 약간 더 아래로 이동하여 다음 변환 및 점 그리기에 적합한 위치를 설정.
rotate: 주사위 면을 수직으로 세우기 위해 회전.
popMatrix: 변환 행렬 스택의 가장 위에 저장된 상태로 변환을 복원합니다. 이 호출로 인해 pushMatrix()에서 저장한 상태로 돌아간다. 이렇게 하면, 이전에 적용된 translate 및 rotate 변환이 모두 원래 상태로 되돌아가 다른 변환에 영향을 미치지 않게 된다.
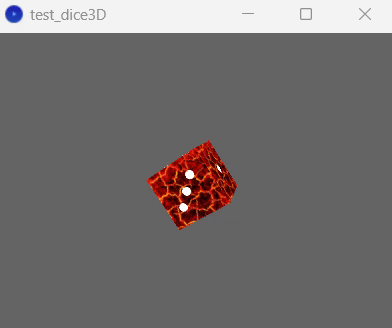
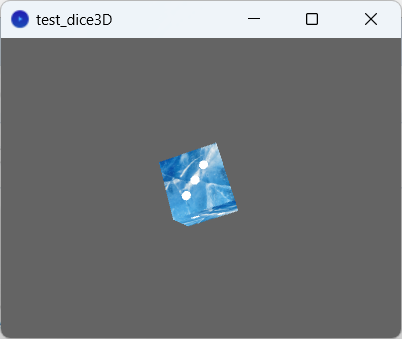
테스트로 3가지 주사위 스킨을 지정해봤다.


'사이드 프로젝트 > 미완성 - 요트다이스 게임 만들기 Yacht! 🎲' 카테고리의 다른 글
| 2. 프로세싱? (0) | 2024.07.14 |
|---|---|
| 1. 게임 개발은 처음인데 (0) | 2024.07.14 |